The Basics of Sticker Cutting

The Basics of Sticker Cutting
The sticker making business can be lucrative for crafters and hobbyists. However, the learning curve can be steep and trial and error can often occur before you get your stickers just right.
The key to producing quality stickers is choosing the right print and cut methods. Whether you use an integrated printer and cutter or a standalone cutting plotter, there are several factors to consider when creating your stickers.
Size
The size of a sticker is one of the most important factors to consider for your brand. It determines how it will be used, as well as its impact on your target audience. For example, if your stickers will be displayed on their water bottles or laptops, it is better to choose smaller ones so that they do not overcrowd the objects they will be attached to. On the other hand, if you want your sticker to be noticeable from a distance, a larger sticker is better.
Moreover, the sticker shape can have an impact on its design and print quality. If you want your stickers to look high-quality and consistent, make sure that they are designed in vector, as this will ensure that the image isn’t distorted by printing errors or scale changes. Lastly, be sure to review the trim and bleed lines of your sticker design before sending it to print, as they are often different from printers to manufacturers. This will ensure that the final product looks great. Additionally, you should also keep in mind that the sticker size may vary slightly depending on the manufacturer and the type of paper it uses.
Shape
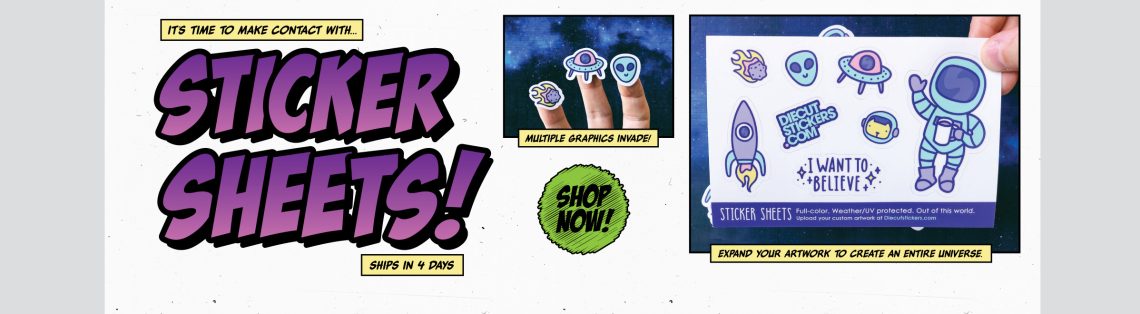
A sticker is a piece of paper, plastic, or vinyl with pressure-sensitive adhesive on one side. It is used for decorative or functional purposes, such as adhering to lunchboxes, papers, lockers, notebooks, walls, cars, windows, and more. The sticker can have a design or text printed on it, and may be made to order in different shapes and sizes.
Sticker designs can get a little rough around the edges. It’s helpful to have a professional sticker cutting designer create your stickers for you so that they look crisp and clean when they’re printed. If you’re looking for a pro, ask your friends and colleagues to recommend someone or use a freelance marketplace like People Per Hour.
Transfer cut stickers are composed of three components—the backing, the actual sticker, and the top layer of transfer tape. This makes them easy to peel from the backing and apply to a surface. They come in standard shapes such as circles, ovals, and rectangles and are available individually or on sticker sheets. They are best for use on items that require quick and easy application or are being used by individuals.
Material
The type of material you choose determines sticker cutting the look and durability of your stickers. Some materials, such as BOPP and white premium sticker paper, are water-resistant and suitable for outdoor use, while others, such as textured or mat board, do not repel moisture and are better suited for indoor applications.
Consider a crack-and-peel backing when designing your stickers to make them easier to remove and apply. You can also add a glossy or matte finish to enhance your sticker’s colors and visual appeal. These finishes also help protect your stickers from damage during shipping, storage and merchandising.
Die cut stickers offer a more defined, sleek look compared to kiss-cut stickers. They’re a great choice for eye-catching designs that you want to attach to items like laptops, smartphones, bikes or water bottles. These stickers can also be used as promotional materials to hand out at events or in swag bags. The extra space on the back can be printed with your brand name, website or contact details, making them an effective branding tool that doubles up as a handy promotional item.
Cut Lines
When creating your sticker design, you may want to add a white cut contour line around the outer edge of your stickers to indicate where the sticker is supposed to be cut. This helps the Printastic machine correctly place and cut your stickers so they have a smooth, clean edge that can be peeled easily without tearing or ripping.
When working with vector graphics, drawing a cut contour line is easy and straightforward. You simply select the object/shape you want to create a cut path for and go to the overhead menu Object > Path > Offset Path. From there, you set the offset to 3mm (or.25in) and the Joins setting to Round to keep the shape nice and neat with no jagged edges.
If you’re working with raster artwork that needs to be die-cut, things are a bit more complicated. But it’s still not too bad. First, make sure your sticker sheet size is 6.75” x 9.25” and turn off any bleed that Cricut Design Space might have added by default. Next, duplicate the ‘Sticker Design’ layer and label it ‘Kiss-Cut’. Merge this into a compound shape, and then click Window > Pathfinder > Unite.
Contour Lines
Contour lines are used to indicate the elevation of a piece of terrain on a topographic map. Each contour line connects points of equal elevation. On topographic maps, each contour line is usually labeled with a number indicating the elevation. Depending on the map, contour lines may be close together, indicating steep hills or mountains, or they might be spaced apart, indicating flat areas.
The process of contour cutting is when a plotter machine cuts a custom shape from an adhesive-backed paper or mylar sheet that has been printed with your artwork. The cutting blade follows the digitally predetermined path of your print, or in this case, the contour line.
When you order Die-Cut stickers or signs from Printastic, the contour cut lines are white and are 1/16″ to 1/8″ thick. These are added to help your sticker stand out on any background and compensate for any slight irregularities that may occur during the actual cutting operation. You can also request for a custom color contour cut line, but this will require additional production time.


You May Also Like
High Strength Carbon Steel Plate: The Ultimate Guide
Nonwoven Geotextile: The Solution for Soil Stabilization and Erosion Control